Recently Added Questions & Answers
A compiler scans the entire program and translates it as a whole into relocatable machine code. It takes large amount of time to analyze the source code but the overall execution time is comparatively faster. It generates intermediate object code which further requires linking, hence requires more memory. It generates the error message only after scanning the whole program. An interpreter translates program one statement at a time. It takes less amount of time to analyze the source code but the overall execution time is slower. No intermediate object code is generated, hence are memory efficient. It continues translating the program until the first error is met, in which case it stops.
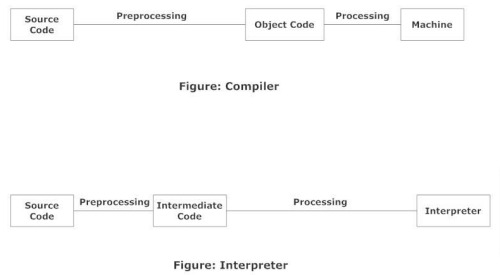
A language processing system consists of 4 main units; the preprocessor, the compiler, the assembler, and the linker/loader. The preprocessor collects the source program split into modules and files, expands macros into language statement. The compiler takes modified source program and generates machine language code. The assembler takes the machine language code and converts it into relocatable object code. The linker links pieces of large programs that need to be compiled in pieces. It also resolves external memory references. The loader loads all the executables into memory.
The compilation process is a sequence of various phases. Each phase takes input from the previous, and passes the output on to the next phase.
LEXICAL ANALYSIS
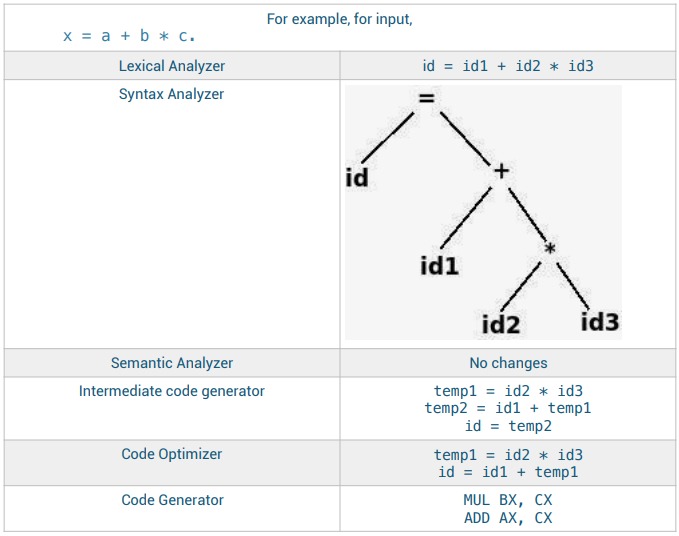
The first phase of compiler works as a text scanner. The lexical analyzer scans the source code as a stream of characters and converts it into meaningful lexemes of the form .
SYNTAX ANALYSIS
It takes the token produced by lexical analysis as input and generates a parse tree (or syntax tree). Token arrangements are checked against the source code grammar.
SEMANTIC ANALYSIS
Checks whether the parse tree constructed follows the rules of language. E.g. assignment of values is between compatible data types, and adding string to an integer. It keeps track of identifiers, their types and expressions. It produces an annotated syntax tree as an output.
INTERMEDIATE CODE GENERATION
After semantic analysis the compiler generates an intermediate code of the source code for the target machine. It represents a program for some abstract machine. It is generated in such a way that it makes it easier to be translated into the target machine code.
CODE OPTIMIZATION
Optimization can be assumed as something that removes unnecessary code lines, and arranges the sequence of statements in order to speed up the program execution without wasting resources. CODE GENERATION This phase takes the optimized representation of the intermediate code and maps it to the target machine language (sequence of re-locatable machine code).
Machine-Dependent Loader Features
Absolute loader is simple and efficient, but the scheme has potential disadvantages One of the most disadvantage is the programmer has to specify the actual starting address, from where the program to be loaded. This does not create difficulty, if one program to run, but not for several programs. Further it is difficult to use subroutine libraries efficiently.
This needs the design and implementation of a more complex loader. The loader must provide program relocation and linking, as well as simple loading functions.
Relocation
The concept of program relocation is, the execution of the object program using any part of the available and sufficient memory. The object program is loaded into memory wherever there is room for it. The actual starting address of the object program is not known until load time. Relocation provides the efficient sharing of the machine with larger memory and when several independent programs are to be run together. It also supports the use of subroutine libraries efficiently. Loaders that allow for program relocation are called relocating loaders or relative loaders.
Methods for specifying relocation
Use of modification record and, use of relocation bit, are the methods available for specifying relocation. In the case of modification record, a modification record M is used in the object program to specify any relocation. In the case of use of relocation bit, each instruction is associated with one relocation bit and, these relocation bits in a Text record is gathered into bit masks.
Modification records are used in complex machines and is also called Relocation and Linkage Directory (RLD) specification. The format of the modification record (M) is as follows. The object program with relocation by Modification records is also shown here.
Modification record
| col 1: | M |
| col 2-7: | relocation address |
| col 8-9: | length (halfbyte) |
| col 10: | flag (+/-) |
| col 11-17: | segment name |
HΛCOPY Λ000000 001077
TΛ000000 Λ1DΛ17202DΛ69202DΛ48101036Λ…Λ4B105DΛ3F2FECΛ032010
TΛ00001DΛ13Λ0F2016Λ010003Λ0F200DΛ4B10105DΛ3E2003Λ454F46
TΛ001035 Λ1DΛB410ΛB400ΛB440Λ75101000Λ…Λ332008Λ57C003ΛB850
TΛ001053Λ1DΛ3B2FEAΛ134000Λ4F0000ΛF1Λ..Λ53C003ΛDF2008ΛB850
TΛ00070Λ07Λ3B2FEFΛ4F0000Λ05
MΛ000007Λ05+COPY
MΛ000014Λ05+COPY
MΛ000027Λ05+COPY
EΛ000000
The relocation bit method is used for simple machines. Relocation bit is 0: no modification is necessary, and is 1: modification is needed. This is specified in the columns 10-12 of text record (T), the format of text record, along with relocation bits is as follows.
Text record
col 1: T
col 2-7: starting address
col 8-9: length (byte)
col 10-12: relocation bits
col 13-72: object code
Twelve-bit mask is used in each Text record (col:10-12 – relocation bits), since each text record contains less than 12 words, unused words are set to 0, and, any value that is to be
modified during relocation must coincide with one of these 3-byte segments. For absolute loader, there are no relocation bits column 10-69 contains object code. The object program with relocation by bit mask is as shown below. Observe FFC - means all ten words are to be modified and, E00 - means first three records are to be modified.
HΛCOPY Λ000000 00107A
TΛ000000Λ1EΛFFCΛ140033Λ481039Λ000036Λ280030Λ300015Λ…Λ3C0003 Λ …
TΛ00001EΛ15ΛE00Λ0C0036Λ481061Λ080033Λ4C0000Λ…Λ000003Λ000000
TΛ001039Λ1EΛFFCΛ040030Λ000030Λ…Λ30103FΛD8105DΛ280030Λ...
TΛ001057Λ0AΛ800Λ100036Λ4C0000ΛF1Λ001000
TΛ001061Λ19ΛFE0Λ040030ΛE01079Λ…Λ508039ΛDC1079Λ2C0036Λ...
EΛ000000
Program Linking
The Goal of program linking is to resolve the problems with external references (EXTREF) and external definitions (EXTDEF) from different control sections.
EXTDEF (external definition) - The EXTDEF statement in a control section names symbols, called external symbols, that are defined in this (present) control section and may be used by other sections.
ex: EXTDEF BUFFER, BUFFEND, LENGTH
EXTDEF LISTA, ENDA
EXTREF (external reference) - The EXTREF statement names symbols used in this (present) control section and are defined elsewhere.
ex: EXTREF RDREC, WRREC EXTREF LISTB, ENDB, LISTC, ENDC
Translation
-
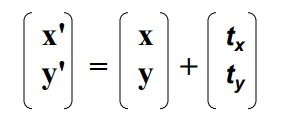
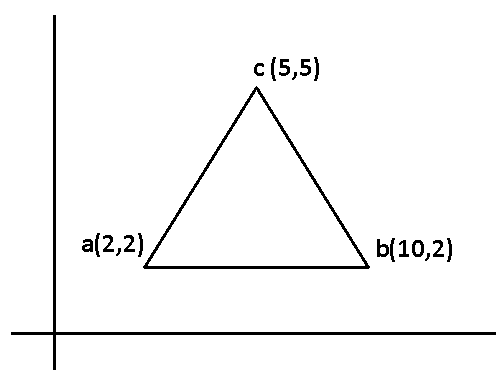
A translation moves all points in an object along the same straight -line path to new positions .
-
The path is represented by a vector, called the translation or shift vector.
-
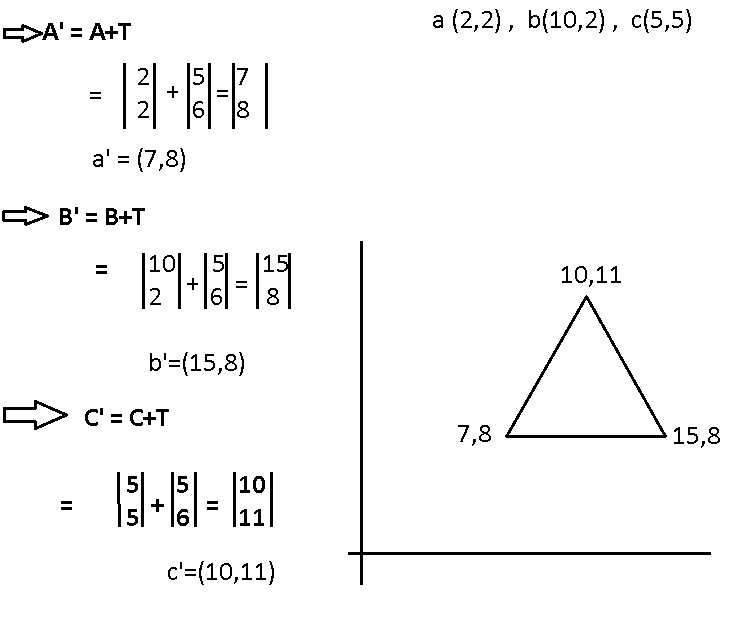
We can write the components:
p'x = px + tx
p'y = py + ty -
or in matrix form:
P' = P + T
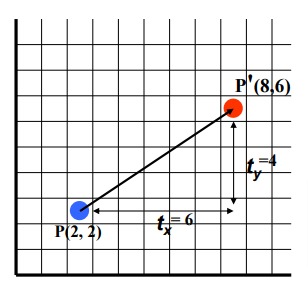
Example:-
A(2,2), F(10,2), C(5,5), Translate the triangle with dx=5 , dy=6
⇒ P1=P+T
Code For OPENGL :-
/* c program for 2d translation */
#include<stdio.h>
#include<graphics.h>
#include<conio.h>
int gd=DETECT,gm;
int n,xs[100],ys[100],i,ty,tx;
void draw();
void translate();
void main()
{
printf("Enter number of sides of polygon: ");
scanf("%d",&n);
printf("Enter co-rdinates: x,y for each vertex );
for(i=0;i<n;i++)
scanf("%d%d",&xs[i],&ys[i]);
printf ("Enter distances for translation (in x and y directions): ");
scanf("%d%d",&tx,&ty);
   initgraph(&gd, &gm, "C:\\TURBOC3\\BGI\\");

      cleardevice();

      //drawing original polygon in RED color

       setcolor (RED);

      draw();

      //Doing translation

      translate();

      //drawing translated polygon in YELLOW color

      setcolor(YELLOW);

      draw();

      getch();

}

void draw()

{

    for(i=0;i<n;i++)

       line(xs[i],ys[i],xs[(i+1)%n],ys[(i+1)%n]);

}

void translate()

{

     for(i=0; i<n; i++)
{
xs[i]+=tx;
ys[i]+=ty;
}
}
Output :
The Display and visibility property specifies whether or not an element is visible.
The visibility property
The initial value of the visibility property is visible, simply meaning that the element is visible unless you change it .
example:
<style type="text/css">

.box {

width: 100px;

height: 100px;

background-color: CornflowerBlue;

}

</style>
<div class="box" style="visibility: hidden;">Box 2</div>
<div class="box">Box 3</div>
→ Three boxes but the middle one has been made invisible by setting the visibility property to hidden. If you try the example, you will notice one very important thing: While the second box is not there, it does leave a pretty big hole in the page. Or in other words: The element can't be seen, but the browser still reserves the space for it!
The display property
If you try the examples, you'll immediately notice the difference: The second box has vanished without a trace, when we used the none value for the display property.
Example:-
The property for doing so is in fact the display property, and while it is used a lot for hiding elements, it is also used for a range of other things - for instance to shift an element between the inline and block type.
In fact, if you have hidden an element by setting display to none, the way to get it back will often be to set display to either inline or block.
In HTML <input type=" "> is an important element of HTML form. The "type" attribute of input element can be various types, which defines information field. Such as <input type="text" name="name"> gives a text box.
1. <input type="text">:
<input> element of type "text" are used to define a single-line input text field.
example:-
<form>
<label>first name</label><br>
<input type="text" name="firstname"><br>
</form>
2. <input type="password">:
The <input> element of type "password" allow a user to enter the password securely in a webpage. The entered text in password filed converted into "*" or ".", so that it cannot be read by another user.
<form>
    <label>Enter Password</label><br>
    <input type="Password" name="password">
</form>
3. <input type="submit">:
The <input> element of type "submit" defines a submit button to submit the form to the server when the "click" event occurs.
<form action="">
<label>User name</label><br>
<input type="text" name="firstname"><br>
<label>Enter Password</label><br>
<input type="Password" name="password"><br>
<br><input type="submit" value="submit">
</form>
4. <input type="radio">:
The <input> type "radio" defines the radio buttons, which allow choosing an option between a set of related options. At a time only one radio button option can be selected at a time.
<form>

  <p>Kindly Select your favorite color</p>

  <input type="radio" name="color" value="red"> Red <br>

  <input type="radio" name="color" value="blue"> blue <br>

  <input type="radio" name="color" value="green">green <br>

  <input type="radio" name="color" value="pink">pink <br>

  <input type="submit" value="submit">

</form>
5. <input type="checkbox">:
The <input> type "checkbox" are displayed as square boxes which can be checked or unchecked to select the choices from the given options.
<form>
<label>Enter your Name:</label>
<input type="text" name="name">
<p>Kindly Select your favourite sports</p>
<input type="checkbox" name="sport1" value="cricket">Cricket<br>
<input type="checkbox" name="sport2" value="tennis">Tennis<br>
<input type="checkbox" name="sport3" value="football">Football<br>
<input type="checkbox" name="sport4" value="baseball">Baseball<br>
<input type="checkbox" name="sport5" value="badminton">Badminton<br><br>
<input type="submit" value="submit">
</form>
6. <input type="button">:
The <input> type "button" defines a simple push button, which can be programmed to control a functionally on any event such as, click event.
- <form>
- <input type="button" value="Clcik me " onclick="alert('you are learning HTML')">
- </form>
7. <input type="email">:
The <input> type "email" creates an input filed which allow a user to enter the e-mail address with pattern validation. The multiple attributes allow a user to enter more than one email address.
<form>
         <label>Enter your Email address</label>
        <input type="email" name="email" required>
        <input type="submit">
</form>
| Get Method | Post Method |
|---|---|
|
GET is used to request data from a specified resource. |
POST is used to send data to a server to create/update a resource. |
|
GET requests can be cached |
POST requests are never cached |
|
GET requests remain in the browser history |
POST requests do not remain in the browser history |
|
GET requests can be bookmarked |
POST requests cannot be bookmarked |
|
GET requests have length restrictions |
POST requests have no restrictions on data length |
Radio button: It is generally used in HTML forms. HTML forms are required when you need to collect some data from the site visitors. A radio button is used when you want to select only one option out of several available options.
<html>
<head>
<title>
Radio Button
<title>
</head>
<body>
<form>
Do you agree this statement?
<br>
<input type="radio"
name="agree"
value="yes">Yes
<br>
<input type="radio"
name="agree"
value="no">No
<br>
<input type="Submit">
</form>
</body>
</html>
Checkbox: Checkboxes are also mostly used in HTML forms. A checkbox allows you to choose one or many options to be selected from a list of options.
<form>
Choose languages you know:
<br>
<input type="checkbox"
name="C"
value="yes">C
<br>
<input type="checkbox"
name="C++"
value="yes">C++
<br>
<input type="checkbox"
name="Java"
value="yes">Java
<br>
<input type="checkbox"
name="Python"
value="yes">Python
<br>
<input type="Submit">
</form>
Difference between radio button and checkbox
| Radio button | Checkbox |
|---|---|
| It is used when only one option to be selected out of several available options. | Checkbox allows one or many options to be selected. |
| It is created by using HTML <input> tag but type attribute is set to radio. | It is also created using HTML <input> tag but type attribute is set to checkbox. |
| It is a single control unit. | It is a multiple control unit. |
| Radio button is presented as a small circle on the screen. | Checkbox is presented as a small square box on the screen. |
| Radio button have only 2 states namely- True & False. | Checkbox have 3 states namely- Checked, unchecked & indeterminate. |
| It is used when you want to limit the users choice to just one option from the range provided. | It is used when you want to allow user to select multiple choices. |
The float CSS property places an element on the left or right side of its container, allowing text and inline elements to wrap around it. The element is removed from the normal flow of the page, though still remaining a part of the flow.
We can float an element by using the float property:-
(1) left :- The element must float on the left side of its containing block.
(2) right:- The element must float on the right side of its containing block.
(3) none :- The element must not float.
(4) inherit :- The element inherits the flow value of its parent.
How Elements Float
A floated element is taken out of the normal flow and shifted to the left or right as far as possible in the space available of the containing element.
The position property specifies the type of positioning method used for an element.
There are five different position values:
- Fixed
- Static
- Relative
- Absolute
- Sticky
-
Static :-
HTML elements are positioned static by default.
Static positioned elements are not affected by the top, bottom, left, and right properties.
An element with
position: static;is not positioned in any special way; it is always positioned according to the normal flow of the page:This <div> element has position: static;
Here is the CSS that is used:
div.static {
position: static;
border: 3px solid #73AD21;
} -
position: relative;
An element with
position: relative;is positioned relative to its normal position.Setting the top, right, bottom, and left properties of a relatively-positioned element will cause it to be adjusted away from its normal position.
-
position: fixed;
It is positioned relative to the viewport, which means it always stays in the same place even if the page is scrolled. The top, right, bottom, and left properties are used to position the element.
-
position: absolute;
position: absolute;is positioned relative to the nearest positioned ancestor. However; if an absolute positioned element has no positioned ancestors, it uses the document body, and moves along with page scrolling. -
position: sticky;
position: sticky;it's positioned based on the user's scroll position.A sticky element toggles between
relativeandfixed, depending on the scroll position. It is positioned relative until a given offset position is met in the viewport - then it "sticks" in place
Jump to Page : 1 2 3 4 5 6 7 8 9 10 11 12 13 14 15 16 17 18 19 20 21 22 23 24 25 26 27 28 29 30 31 32 33 34 35 36 37 38 39 40 41 42 43 44 45 46 47 48 49 50 51 52 53
Recommended Question Bank
View
View
View
View
View
View
View
View
View
View
View
View
View
View
View
View
View
View
View
View
View
View
View
View
View
View
View
View
View
View
View
View
View
View
View
View