Recently Added Questions & Answers
The Goal of program linking is to resolve the problems with external references (EXTREF) and external definitions (EXTDEF) from different control sections.
EXTDEF (external definition) - The EXTDEF statement in a control section names symbols, called external symbols, that are defined in this (present) control section and may be used by other sections.
ex: EXTDEF BUFFER, BUFFEND, LENGTH EXTDEF LISTA, ENDA EXTREF (external reference) - The EXTREF statement names symbols used in this (present) control section and are defined elsewhere. ex: EXTREF RDREC, WRREC EXTREF LISTB, ENDB, LISTC, ENDC
How to implement EXTDEF and EXTREF
The assembler must include information in the object program that will cause the loader to insert proper values where they are required – in the form of Define record (D) and, Refer record(R).
Define record
The format of the Define record (D) along with examples is as shown here. Col. 1 D Col. 2-7 Name of external symbol defined in this control section Col. 8-13 Relative address within this control section (hexadecimal) Col.14-73 Repeat information in Col. 2-13 for other external symbols
The figure below shows the processing of an object program using Linkage editor. A
linkage editor produces a linked version of the program – often called a load module or
an executable image – which is written to a file or library for later execution. The linked
program produced is generally in a form that is suitable for processing by a relocating
loader.
Some useful functions of Linkage editor are, an absolute object program can be created, if starting address is already known. New versions of the library can be included without changing the source program. Linkage editors can also be used to build packages of subroutines or other control sections that are generally used together. Linkage editors often allow the user to specify that external references are not to be resolved by automatic library search – linking will be done later by linking loader – linkage editor + linking loader – savings in space
Some useful functions of Linkage editor are, an absolute object program can be created, if starting address is already known. New versions of the library can be included without changing the source program. Linkage editors can also be used to build packages of subroutines or other control sections that are generally used together. Linkage editors often allow the user to specify that external references are not to be resolved by automatic library search – linking will be done later by linking loader – linkage editor + linking loader – savings in space
The lexical analyzer scans the input from left to right one character at a time. It uses two pointers begin ptr(bp) and forward to keep track of the pointer of the input scanned.
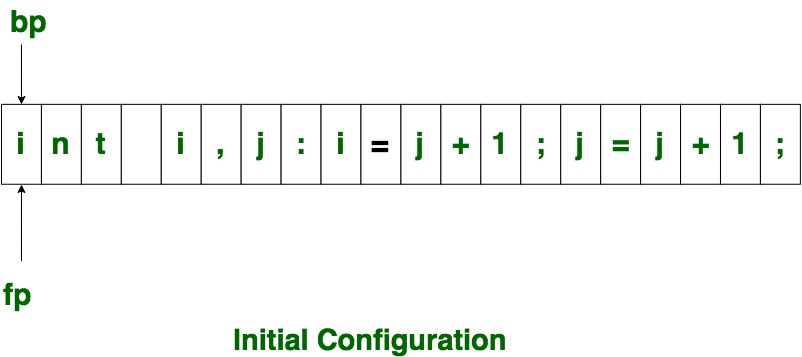
Initially both the pointers point to the first character of the input string as shown below

The forward ptr moves ahead to search for end of lexeme. As soon as the blank space is encountered, it indicates end of lexeme. In above example as soon as ptr (fp) encounters a blank space the lexeme “int” is identified. The fp will be moved ahead at white space, when fp encounters white space, it ignore and moves ahead. then both the begin ptr(bp) and forward ptr(fp) are set at next token. The input character is thus read from secondary storage, but reading in this way from secondary storage is costly. hence buffering technique is used.A block of data is first read into a buffer, and then second by lexical analyzer. there are two methods used in this context: One Buffer Scheme, and Two Buffer Scheme. These are explained as following below.
Initially both the pointers point to the first character of the input string as shown below
The forward ptr moves ahead to search for end of lexeme. As soon as the blank space is encountered, it indicates end of lexeme. In above example as soon as ptr (fp) encounters a blank space the lexeme “int” is identified. The fp will be moved ahead at white space, when fp encounters white space, it ignore and moves ahead. then both the begin ptr(bp) and forward ptr(fp) are set at next token. The input character is thus read from secondary storage, but reading in this way from secondary storage is costly. hence buffering technique is used.A block of data is first read into a buffer, and then second by lexical analyzer. there are two methods used in this context: One Buffer Scheme, and Two Buffer Scheme. These are explained as following below.
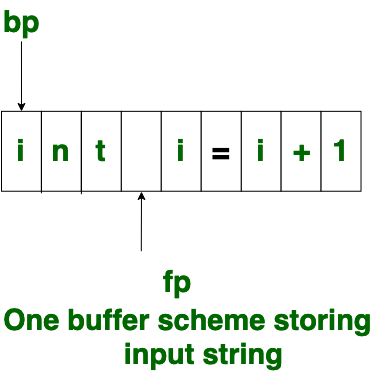
- One Buffer Scheme:
In this scheme, only one buffer is used to store the input string but the problem with this scheme is that if lexeme is very long then it crosses the buffer boundary, to scan rest of the lexeme the buffer has to be refilled, that makes overwriting the first of lexeme.
- Two Buffer Scheme:
To overcome the problem of one buffer scheme, in this method two buffers are used to store the input string. the first buffer and second buffer are scanned alternately. when end of current buffer is reached the other buffer is filled. the only problem with this method is that if length of the lexeme is longer than length of the buffer then scanning input cannot be scanned completely. Initially both the bp and fp are pointing to the first character of first buffer. Then the fp moves towards right in search of end of lexeme. as soon as blank character is recognized, the string between bp and fp is identified as corresponding token. to identify, the boundary of first buffer end of buffer character should be placed at the end first buffer. Similarly end of second buffer is also recognized by the end of buffer mark present at the end of second buffer. when fp encounters first eof, then one can recognize end of first buffer and hence filling up second buffer is started. in the same way when second eof is obtained then it indicates of second buffer. alternatively both the buffers can be filled up until end of the input program and stream of tokens is identified. This eof character introduced at the end is calling Sentinel which is used to identify the end of buffer.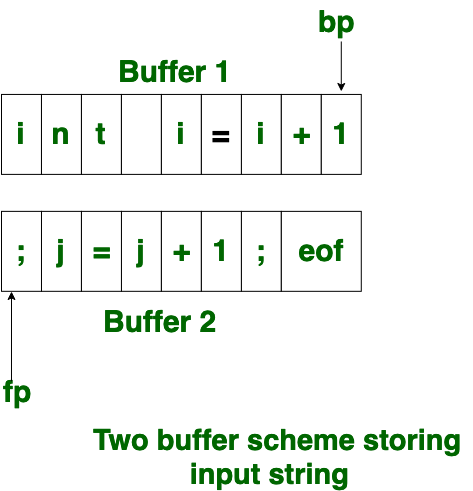
Lexical analyzer performs below given tasks:
Example of Lexical Analysis, Tokens, Non-Tokens
Consider the following code that is fed to Lexical Analyzer
Examples of Tokens created
- Helps to identify token into the symbol table
- Removes white spaces and comments from the source program
- Correlates error messages with the source program
- Helps you to expands the macros if it is found in the source program
- Read input characters from the source program
Example of Lexical Analysis, Tokens, Non-Tokens
Consider the following code that is fed to Lexical Analyzer
#include <stdio.h>
    int maximum(int x, int y) {
        // This will compare 2 numbers
        if (x > y)
            return x;
        else {
            return y;
        }
    }
Examples of Tokens created
| Lexeme | Token |
| int | Keyword |
| maximum | Identifier |
| ( | Operator |
| int | Keyword |
| x | Identifier |
| , | Operator |
| int | Keyword |
| Y | Identifier |
| ) | Operator |
| { | Operator |
| If | Keyword |
Examples of Nontokens
| Type | Examples |
| Comment | // This will compare 2 numbers |
| Pre-processor directive | #include <stdio.h> |
| Pre-processor directive | #define NUMS 8,9 |
| Macro | NUMS |
| Whitespace | /n /b /t |
The main task of lexical analysis is to read input characters in the code and produce tokens.
Lexical analyzer scans the entire source code of the program. It identifies each token one by one. Scanners are usually implemented to produce tokens only when requested by a parser. Here is how this works-
Lexical Analyzer skips whitespaces and comments while creating these tokens. If any error is present, then Lexical analyzer will correlate that error with the source file and line number.
- "Get next token" is a command which is sent from the parser to the lexical analyzer.
- On receiving this command, the lexical analyzer scans the input until it finds the next token.
- It returns the token to Parser.
Lexical Analyzer skips whitespaces and comments while creating these tokens. If any error is present, then Lexical analyzer will correlate that error with the source file and line number.
LEXICAL ANALYSIS is the very first phase in the compiler designing. A Lexer takes the modified source code which is written in the form of sentences . In other words, it helps you to convert a sequence of characters into a sequence of tokens. The lexical analyzer breaks this syntax into a series of tokens. It removes any extra space or comment written in the source code.
Programs that perform lexical analysis are called lexical analyzers or lexers. A lexer contains tokenizer or scanner. If the lexical analyzer detects that the token is invalid, it generates an error. It reads character streams from the source code, checks for legal tokens, and pass the data to the syntax analyzer when it demands.
Example
Example
How Pleasant Is The Weather?
HowPl easantIs Th ewe ather?
The compilation process is a sequence of various phases. Each phase takes input from its previous stage, has its own representation of source program, and feeds its output to the next phase of the compiler. Let us understand the phases of a compiler.
Lexical Analysis
The first phase of scanner works as a text scanner. This phase scans the source code as a stream of characters and converts it into meaningful lexemes. Lexical analyzer represents these lexemes in the form of tokens as:
Syntax Analysis
The next phase is called the syntax analysis or parsing. It takes the token produced by lexical analysis as input and generates a parse tree (or syntax tree). In this phase, token arrangements are checked against the source code grammar, i.e. the parser checks if the expression made by the tokens is syntactically correct.
Semantic Analysis
Semantic analysis checks whether the parse tree constructed follows the rules of language. For example, assignment of values is between compatible data types, and adding string to an integer. Also, the semantic analyzer keeps track of identifiers, their types and expressions; whether identifiers are declared before use or not etc. The semantic analyzer produces an annotated syntax tree as an output.
Intermediate Code Generation
After semantic analysis the compiler generates an intermediate code of the source code for the target machine. It represents a program for some abstract machine. It is in between the high-level language and the machine language. This intermediate code should be generated in such a way that it makes it easier to be translated into the target machine code.
Code Optimization
The next phase does code optimization of the intermediate code. Optimization can be assumed as something that removes unnecessary code lines, and arranges the sequence of statements in order to speed up the program execution without wasting resources (CPU, memory).
Code Generation
In this phase, the code generator takes the optimized representation of the intermediate code and maps it to the target machine language. The code generator translates the intermediate code into a sequence of (generally) re-locatable machine code. Sequence of instructions of machine code performs the task as the intermediate code would do.
Symbol Table
It is a data-structure maintained throughout all the phases of a compiler. All the identifier's names along with their types are stored here. The symbol table makes it easier for the compiler to quickly search the identifier record and retrieve it. The symbol table is also used for scope management.
Lexical Analysis
The first phase of scanner works as a text scanner. This phase scans the source code as a stream of characters and converts it into meaningful lexemes. Lexical analyzer represents these lexemes in the form of tokens as:
<token-name, attribute-value>
Syntax Analysis
The next phase is called the syntax analysis or parsing. It takes the token produced by lexical analysis as input and generates a parse tree (or syntax tree). In this phase, token arrangements are checked against the source code grammar, i.e. the parser checks if the expression made by the tokens is syntactically correct.
Semantic Analysis
Semantic analysis checks whether the parse tree constructed follows the rules of language. For example, assignment of values is between compatible data types, and adding string to an integer. Also, the semantic analyzer keeps track of identifiers, their types and expressions; whether identifiers are declared before use or not etc. The semantic analyzer produces an annotated syntax tree as an output.
Intermediate Code Generation
After semantic analysis the compiler generates an intermediate code of the source code for the target machine. It represents a program for some abstract machine. It is in between the high-level language and the machine language. This intermediate code should be generated in such a way that it makes it easier to be translated into the target machine code.
Code Optimization
The next phase does code optimization of the intermediate code. Optimization can be assumed as something that removes unnecessary code lines, and arranges the sequence of statements in order to speed up the program execution without wasting resources (CPU, memory).
Code Generation
In this phase, the code generator takes the optimized representation of the intermediate code and maps it to the target machine language. The code generator translates the intermediate code into a sequence of (generally) re-locatable machine code. Sequence of instructions of machine code performs the task as the intermediate code would do.
Symbol Table
It is a data-structure maintained throughout all the phases of a compiler. All the identifier's names along with their types are stored here. The symbol table makes it easier for the compiler to quickly search the identifier record and retrieve it. The symbol table is also used for scope management.
APPROACHES TO CSS LAYOUT
One of the main problems faced by web designers is that the size of the screen used to view the page can vary quite a bit. Most designers take one of two basic approaches to dealing with the problems of screen size. While there are other approaches than these two, the others are really just enhancements to these two basic models.
1 FIXED LAYOUT
• The first approach is to use a fixed layout. In a fixed layout, the basic width of the design is set by the designer, typically corresponding to an “ideal” width based on a “typical” monitor resolution.
• A common width used is something in the 960 to 1000 pixel range, which fits nicely in the common desktop monitor resolution (1024 × 768). This content can then be positioned on the left or the center of the monitor.
• Fixed layouts are created using pixel units, typically with the entire content within a <div> container (often named "container", "main", or "wrapper") whose width property has been set to some width, as shown in Figure.
• The advantage of a fixed layout is that it is easier to produce and generally has a predictable visual result. It is also optimized for typical desktop monitors; however, as more and more user visits are happening via smaller mobile devices, this advantage might now seem to some as a disadvantage.
• Fixed layouts have other drawbacks. For larger screens, there may be an excessive amount of blank space to the left and/or right of the content. Much worse is when the browser window shrinks below the fixed width; the user will have to horizontally scroll to see all the content, as shown in Figure
2 LIQUID LAYOUT
• The second approach to dealing with the problem of multiple screen sizes is to use a liquid layout (also called a fluid layout). In this approach, widths are not specified using pixels, but percentage values.Percentage values in CSS are a percentage of the current browser width, so a layout in which all widths are expressed as percentages should adapt to any browser size, as shown in Figure 5.29.
• The obvious advantage of a liquid layout is that it adapts to different browser sizes, so there is neither wasted white space nor any need for horizontal scrolling.
Advantages and Limitations of Fluid/Liquid Layout
Advantages in certain situations
can be constrained with max width, min width property, does not include padding borders or margin, Max height and min height does not include padding, borders, or margin By using a mixture of width, height, overflow, and max, min we can take control of both fixed width, fluid and fixed/fluid layouts Pros/Benifits
-Fluid can be more user friendly because it adjusts to the users set up. -If designed well can eliminate horizontal scroll bars that appear on small screen sizes. -Also with wider screens more or all of the content will appear on the screen above the fold and so there may be no need for vertical scrolling at all.
Cons/Limitations
-The designer has less control over what the user sees -Elements that usually have a fixed width such as images, video may have to be set at multiple widths to accommodate different screen sizes. -Lack of content on large screen sizes may create a lot of white space and long unreadable paragraph lines.
Advantages and disadvantages of fixed Layout
----- These are the advantages of fixed-width design: -----
-The basic layout of the page remains the same regardless of canvas size. This may be a priority for companies interested in presenting a consistent corporate image for every visitor. -Fixed-width pages and columns provide better control over line lengths, preventing them from becoming too long when the page is viewed on a large monitor.
---- disadvantages ----
-If the available browser window is smaller than the grid for the page, parts of the page will not be visible and may require horizontal scrolling to be viewed. Horizontal scrolling is a hindrance to ease of use, so it should be avoided. (One solution is to choose a page size that serves the most people, as discussed later in this section.) -Elements may shift unpredictably if the font size in the browser is larger or smaller than the font size used in the design process. -Trying to exert absolute control over the display of a web page is bucking the medium. The Web is not like print; it has its own peculiarities and strengths.
The position property in CSS tells about the method of positioning for an element or an HTML entity.
There are five different types of position property available in CSS:
1-> Fixed 2-> Static 3-> Relative 4-> Absolute 5-> Sticky
The positioning of an element can be done using the top, right, bottom and left property. These specify the distance of an HTML element from the edge of the viewport. To set the position by these four properties, we have to declare the positioning method.
Types of positioning methods in details:
1. Fixed
Any HTML element with position: fixed property will be positioned relative to the viewport. An element with fixed positioning allows it to remain at the same position even we scroll the page. We can set the position of the element using the top, right, bottom, left.
2. Static
This method of positioning is set by default. If we don’t mention the method of positioning for any element, the element has the position:static method by default. By defining Static, the top, right, bottom and left will not have any control over the element. The element will be positioned with the normal flow of the page.
CSS code :-
3. Relative
An element with position: relative is positioned relatively with the other elements which are sitting at top of it. If we set its top, right, bottom or left, other elements will not fill up the gap left by this element.
4. Absolute
An element with position: absolute will be positioned with respect to its parent. Positioning of this element does not depend upon its siblings or the elements which are at same level.
5. Sticky
Element with position: sticky and top: 0 played a role between fixed & relative based on the position where it is placed. If the element is placed at the middle of the document then when user scrolls the document, the sticky element starts scrolling until it touch the top. When it touches the top, it will be fixed at that place inspite of further scrolling. We can stick the element at bottom, with the bottom property.
Below is the CSS code to illustrate the sticky property:
There are five different types of position property available in CSS:
1-> Fixed 2-> Static 3-> Relative 4-> Absolute 5-> Sticky
The positioning of an element can be done using the top, right, bottom and left property. These specify the distance of an HTML element from the edge of the viewport. To set the position by these four properties, we have to declare the positioning method.
Types of positioning methods in details:
1. Fixed
Any HTML element with position: fixed property will be positioned relative to the viewport. An element with fixed positioning allows it to remain at the same position even we scroll the page. We can set the position of the element using the top, right, bottom, left.
<!-->html code<-->
<body>
	<div class="fixed">This div has <span>position: fixed;</span></div>
	<pre>
			Lorem ipsum dolor sits amet, consectetur adipiscing elit.
			Nunc eget mauris at urna hendrerit iaculis sit amet et ipsum.
			Maecenas nec mi eget leo malesuada vehicula.
			Nam eget velit maximus, elementum ante pretium, aliquet felis.
			Aliquam quis turpis laoreet, porttitor lacus at, posuere massa.
	</pre>
</body>
// css code
body
{
	margin: 0;
	padding: 20px;
	font-family: sans-serif;
	background: #efefef;
}

.fixed
{
	position: fixed;
	background: #cc0000;
	color: #ffffff;
	padding: 30px;
	top: 50;
	left: 10;
}

span
{
	padding: 5px;
	border: 1px #ffffff dotted;
}
2. Static
This method of positioning is set by default. If we don’t mention the method of positioning for any element, the element has the position:static method by default. By defining Static, the top, right, bottom and left will not have any control over the element. The element will be positioned with the normal flow of the page.
<!-->html code<-->
<body>
	<div class="static">This div has <span>position: static;</span></div>
	<pre>
			Lorem ipsum dolor sits amet, consectetur adipiscing elit.
			Nunc eget mauris at urna hendrerit iaculis sit amet et ipsum.
			Maecenas nec mi eget leo malesuada vehicula.
			Nam eget velit maximus, elementum ante pretium, aliquet felis.
			Aliquam quis turpis laoreet, porttitor lacus at, posuere massa.
	</pre>
</body>
CSS code :-
// css code
body
{
	margin: 0;
	padding: 20px;
	font-family: sans-serif;
	background: #efefef;
}

.static
{
	position: static;
	background: #cc0000;
	color: #ffffff;
	padding: 30px;
}

span
{
	padding: 5px;
	border: 1px #ffffff dotted;
}
3. Relative
An element with position: relative is positioned relatively with the other elements which are sitting at top of it. If we set its top, right, bottom or left, other elements will not fill up the gap left by this element.
<!-->html code<-->
<body>
	<div class="relative">This div has
		<span>position: relative;</span></div>
	<pre>
			Lorem ipsum dolor sits amet, consectetur adipiscing elit.
			Nunc eget mauris at urna hendrerit iaculis sit amet et ipsum.
			Maecenas nec mi eget leo malesuada vehicula.
			Nam eget velit maximus, elementum ante pretium, aliquet felis.
			Aliquam quis turpis laoreet, porttitor lacus at, posuere massa.
	</pre>
</body>
// css code
body
{
	margin: 0;
	padding: 20px;
	font-family: sans-serif;
	background: #efefef;
}

.relative
{
	position: relative;
	background: #cc0000;
	color: #ffffff;
	padding: 30px;
}

span
{
	padding: 5px;
	border: 1px #ffffff dotted;
}
4. Absolute
An element with position: absolute will be positioned with respect to its parent. Positioning of this element does not depend upon its siblings or the elements which are at same level.
<!-->html code<-->
<body>
	<pre>
		Lorem ipsum dolor sits amet, consectetur adipiscing elit.
		Nunc eget mauris at urna hendrerit iaculis sit amet et ipsum.
		Maecenas nec mi eget leo malesuada vehicula.
		<div class="relative">
			<p>This div has <span><strong>position: relative;</strong>
														</span></p>
			<div class="absolute">
			This div has <span><strong>position:
							absolute;</strong></span>
			</div>
		</div>
		Nam eget velit maximus, elementum ante pretium, aliquet felis.
		Aliquam quis turpis laoreet, porttitor lacus at, posuere massa.
	</pre>
</body>
// css code
body
{
	margin: 0;
	padding: 20px;
	font-family: sans-serif;
	background: #efefef;
}

.absolute
{
	position: absolute ;
	background: #cc0000;
	color: #ffffff;
	padding: 30px;
	font-size: 15px;
	bottom: 20px;
	right: 20px;
}

.relative
{
	position: relative;
	background: #aad000;
	height: 300px;
	font-size: 30px;
	border: 1px solid #121212;
	text-align: center;
}

span
{
	padding: 5px;
	border: 1px #ffffff dotted;
}

pre
{
	padding: 20px;
	border: 1px solid #000000;
}
5. Sticky
Element with position: sticky and top: 0 played a role between fixed & relative based on the position where it is placed. If the element is placed at the middle of the document then when user scrolls the document, the sticky element starts scrolling until it touch the top. When it touches the top, it will be fixed at that place inspite of further scrolling. We can stick the element at bottom, with the bottom property.
<!-->html code<-->
<body>
     <pre>
        Lorem ipsum dolor sits amet, consectetur adipiscing elit.
        Nunc eget mauris at urna hendrerit iaculis sit amet et ipsum.
        Maecenas nec mi eget leo malesuada vehicula.
                <div class="sticky">
                     This div has <span>position: sticky;</span>
                </div>
        Nam eget velit maximus, elementum ante pretium, aliquet felis.
        Aliquam quis turpis laoreet, porttitor lacus at, posuere massa.
     </pre>
</body>
Below is the CSS code to illustrate the sticky property:
// css code
body
{
    margin: 0;
    padding: 20px;
    font-family: sans-serif;
    background: #efefef;
}

.sticky
{
    position: sticky;
    background: #cc0000;
    color: #ffffff;
    padding: 30px;
        top: 10px;
        right: 50px;
}

span
{
    padding: 5px;
    border: 1px #ffffff dotted;
}

pre
{
       padding: 20px;
       border: 1px solid #000000;
}
Definition:
Write a C++ program to define a Employee class with the following Members: Data Members: empid, emp salary Member Functions: to read a data and to print the data. Program should use array within class to read 3 employee information and print the 3 employee information.
Source Code for C++ program to read and print Employee information
Output:
Enter the Employee ID. 123
Enter the Employee salary. 10000
Enter the Employee ID. 234
Enter the Employee salary. 20000
Enter the Employee ID. 345
Enter the Employee salary. 30000
Employee Information is:
EmpID EMP Salary
123 10000
234 20000
345 30000
Write a C++ program to define a Employee class with the following Members: Data Members: empid, emp salary Member Functions: to read a data and to print the data. Program should use array within class to read 3 employee information and print the 3 employee information.
Source Code for C++ program to read and print Employee information
#include<iostream>
 using namespace std;
 class Employee
 {
     private:
     int empid[3];
     int empsal[3];
     public:
     void read_data();
     void print_data();
 };
 void Employee::read_data()
 {
     for (int i=0; i<3;i++)
    {
         cout<<"Enter the Employee ID. ";
         cin>>empid[i];
         cout<<"Enter the Employee salary. ";
         cin>>empsal[i];
     }
 }
 void Employee::print_data()
 {
     for (int i=0; i<3;i++)
     {
         cout<<empid[i]<<"\t"<<empsal[i]<<endl;
     }
 }
 int main()
 {
     Employee emp;
     emp.read_data();
     cout<<endl<<"Employee Information is: "<<endl;
     cout<<"EmpID\tEMP Salary"<<endl;
     emp.print_data();
 }
Output:
Jump to Page : 1 2 3 4 5 6 7 8 9 10 11 12 13 14 15 16 17 18 19 20 21 22 23 24 25 26 27 28 29 30 31 32 33 34 35 36 37 38 39 40 41 42 43 44 45 46 47 48 49 50 51 52 53
Recommended Question Bank
General - Computer Science
View
View
- Computer organisation and architecture
View
View
NA - Java
View
View
- javascript
View
View
- STORAGE AREA NETWORKS
View
View
Mejona - Mejona Technology
View
View
VTU - NCES(Non - Conventional Energy Resources
View
View
- Java Basic Codes
View
View
VTU - STORAGE AREA NETWORK
View
View
- HIGHWAY ENGINEERING
View
View
- COMPUTER ORGANIZATION
View
View
- Quantity Surveying and Contracts Management
View
View
- Design of RC Structural Elements
View
View
- Ground Water and Hydraulic
View
View
- Urban Transport Planning
View
View
- Basic Geotechnical Engineering
View
View
VTU - Municipal Waste Water Engineering
View
View
VTU - Design of Steel Structures Elements
View
View
- Interview Question Bank
View
View
VTU - Artificial Intelligence
View
View
Visvesvaraya Technological University (VTU) - Ground water hydraulic
View
View
-
View
View
VTU - Artificial intelligence and Machine Learning (AIML)
View
View
VTU - Energy and Environment
View
View
VTU - User Interface Design
View
View
- Data Structures and Algorithms
View
View
VTU - Big Data Analytics
View
View
VTU - Engineering Chemistry
View
View
VTU - User Interface Design (UID)
View
View
Entrance Exam for job - Entrance Exam Questions
View
View
VTU - Elements of Civil Engineering and Mechanic
View
View
VTU - Computer Graphics and Visualization
View
View
VTU - Object Oriented Concepts
View
View
VTU - System Software and Compiler Design
View
View
VTU - Web Technology and its Applications
View
View
VTU - Cloud Computing and Its Applications
View
View